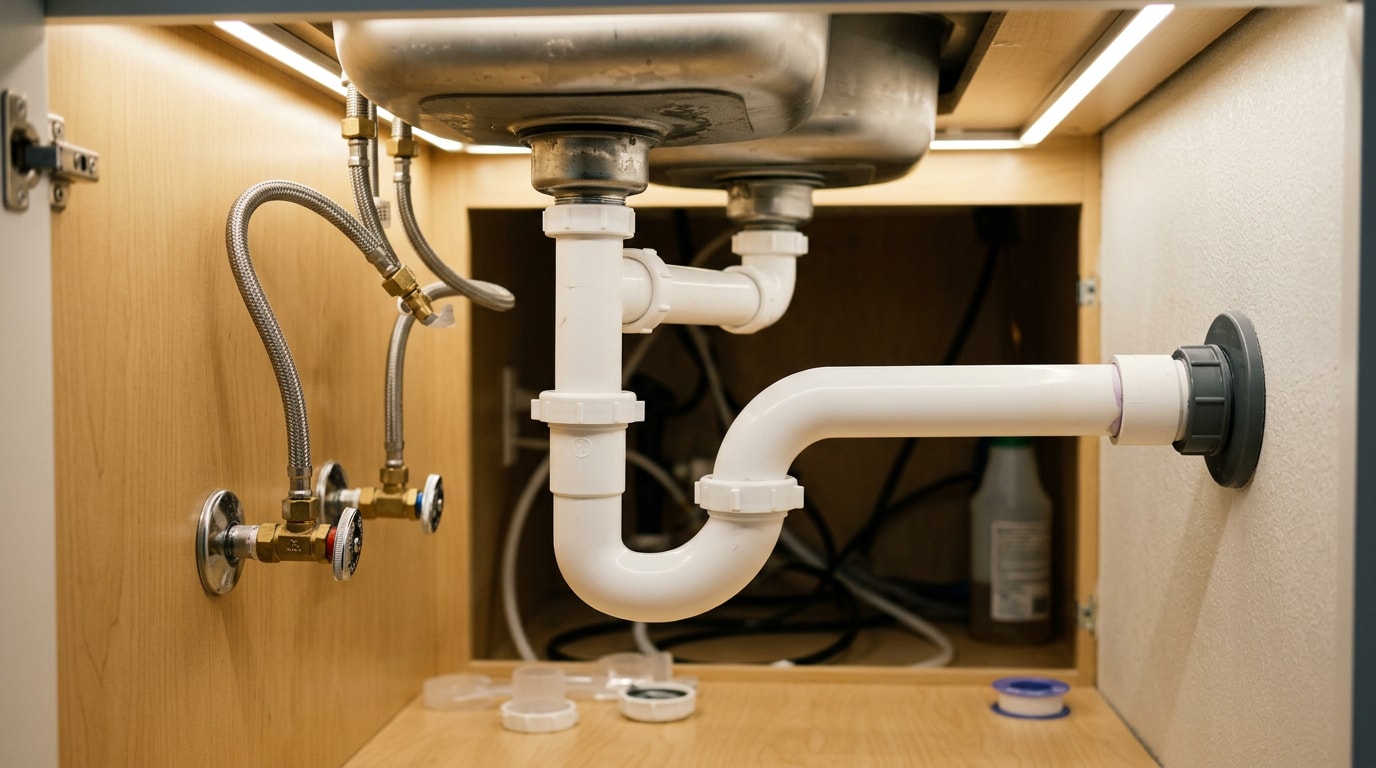
A proper kitchen sink plumbing diagram shows exactly how water enters your Bonneau, SC kitchen and how wastewater leaves it, from the shut-off valves under the cabinet to the P-trap that keeps sewer gas out of your house. Pull the cabinet doors open and the pipe maze makes a lot more sense once you know the order the parts are supposed to go in. This guide breaks down every component, the rough-in numbers Berkeley County plumbers actually use, and the three mistakes that fail inspection most often.
Kitchen Sink Plumbing Diagram: Every Part Explained
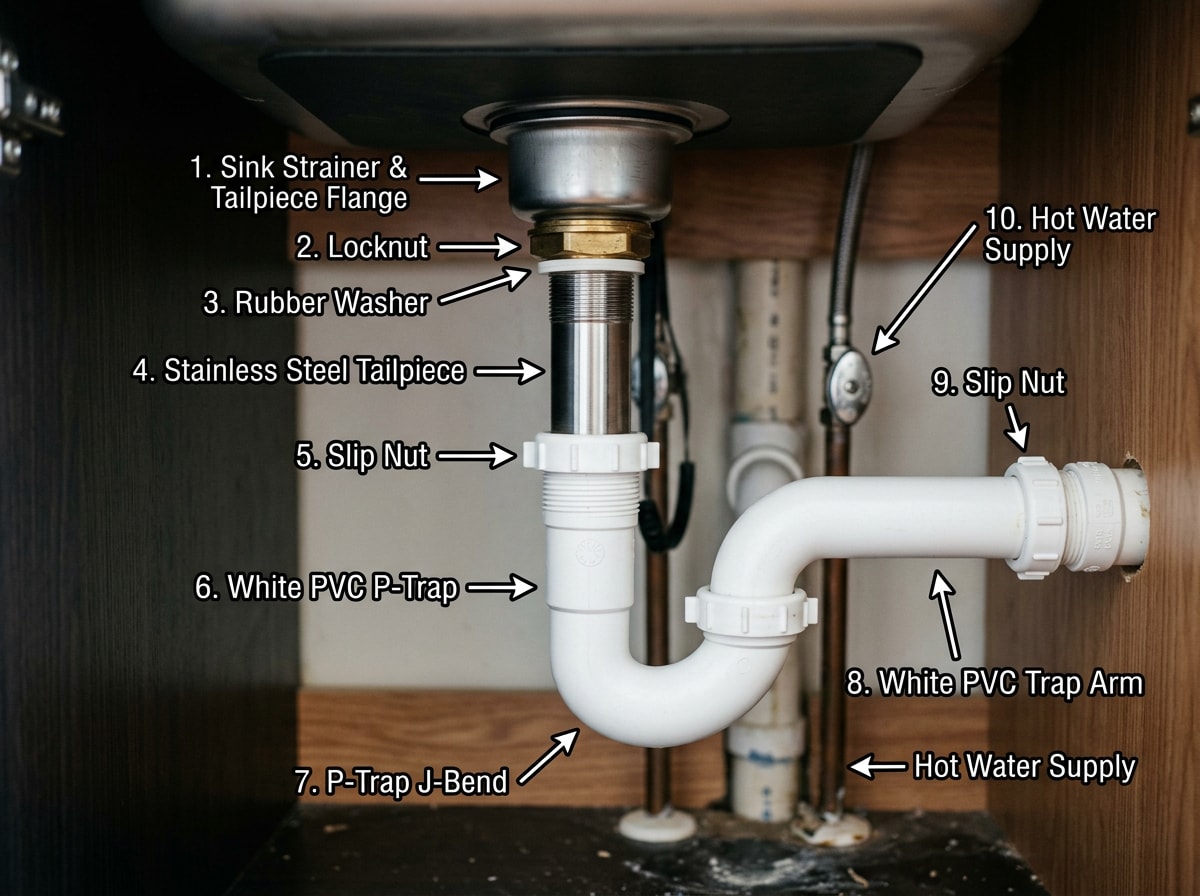
Every proper diagram follows the same logic: supply lines come in from the wall, waste goes out toward the sewer or septic line, and a sealed trap sits between the two to block odors. The parts repeat across single-basin and double-basin setups alike: tailpiece, P-trap, trap arm, sanitary tee, strainer basket, and shut-off valves.
Getting the sequence right isn't cosmetic. It preserves the water seal that blocks sewer gas, and it keeps drainage moving downhill the way gravity requires.
| Part | Symbol on Diagram | Function |
|---|---|---|
| Shut-off valve | Small valve icon near wall | Stops water flow for repairs |
| Supply tube | Thin flexible line | Carries hot/cold water to faucet |
| Drain basket/strainer | Funnel shape in basin | Catches debris, seals drain opening |
| Tailpiece | Vertical tube below sink | Connects basket to trap |
| P-trap | Curved U-shape | Holds water seal, blocks sewer gas |
| Trap arm | Horizontal pipe after trap | Carries water to wall stub-out |
If you're planning a remodel, this table is the shorthand our licensed plumbing team uses when quoting a job, so it's worth bookmarking before that first conversation.
Supply Side Components
The supply side starts at the wall, where hot and cold shut-off valves control water independently. Flexible supply lines, usually 12 to 20 inches long, run from those valves up to the faucet connections underneath the sink.
Most supply lines use 3/8-inch compression fittings on one end and a faucet-specific fitting on the other. Braided stainless steel has largely replaced vinyl tubing because it resists kinks and lasts longer.
Drain Side Components
The drain side runs in a fixed order: drain basket, tailpiece, P-trap, waste arm, then the drain stub-out in the wall or floor. Each piece depends on the one before it holding its slope and seal correctly.
Skipping a gasket or misthreading the tailpiece is one of the most common reasons a "finished" sink still drips slowly at the joints months later.
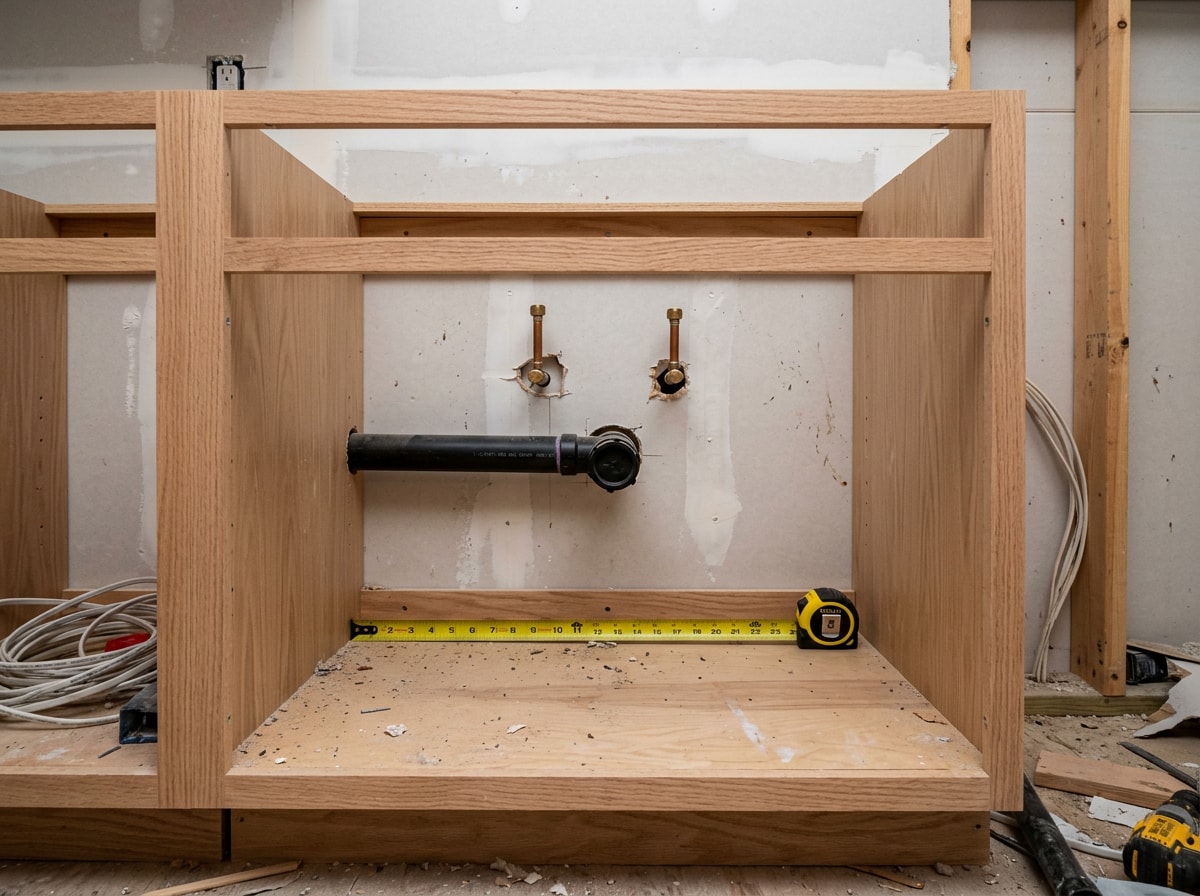
Kitchen Sink Rough-In Dimensions for Bonneau, SC Homes
| Measurement | Standard Range |
|---|---|
| Drain rough-in height | 16–20 in. from floor (14–18 in. common in practice) |
| Supply line rough-in height | 20–24 in. from floor |
| Minimum drain pipe diameter | 1½ in. |
| Maximum trap drop | 24 in. |
| Trap arm slope | ¼ in. per foot |
No code sets an exact drain height. What the code does regulate is the trap itself: the vertical distance from the fixture outlet to the trap weir shall not exceed 24 inches, and the horizontal distance shall not exceed 30 inches measured from the centerline of the fixture outlet to the centerline of the inlet of the trap . Plumbers then work backward from that limit to decide where the drain stub-out lands, which is why field heights cluster in the 14–18 inch range even though wider charts list 16–20.
One rule that trips up DIY remodels: a fixture shall not be double trapped . If your double-bowl sink has two separate P-traps instead of one shared trap, that's a code violation waiting to be flagged at inspection.
Single Bowl vs. Double Bowl Kitchen Sink Plumbing
Sink style drives almost every downstream plumbing decision, basin count, drain configuration, and how complicated venting gets.
- Single basin sink: one drain opening, one straight tailpiece, simplest install.
- Double basin sink: two drain openings sharing one trap via continuous waste or a tee fitting.
- Farmhouse sink: deeper basin often needs a lowered drain connection and sometimes a shallower P-trap to clear cabinet framing.
- Island sink: no wall to vent through, so it typically needs an air admittance valve or a looped vent back to a wall stack.
Single Bowl Layout
A single bowl diagram follows a straight vertical drop: basket strainer, locknut and gasket, tailpiece, then directly into the P-trap. This is now the most common layout in kitchen remodels, since large single-basin and farmhouse sinks have mostly displaced double bowls in new installs.
Because there's only one drain path, this layout needs fewer fittings, which also means fewer potential leak points down the road.
Double Bowl Layout
Double bowl plumbing has to route two drain openings into a single trap. The continuous waste method uses a horizontal connector pipe that joins both tailpieces before dropping into one shared P-trap. The alternative uses a tee fitting that merges each bowl's tailpiece into a single line just above the trap.
Code requires this shared-trap setup rather than two separate traps, because double-trapping creates an air pocket that causes slow drainage or siphons one trap's water seal dry. There's one narrow exception: a combination plumbing fixture is permitted to be installed on one trap, provided that one compartment is not more than 6 inches deeper than the other compartment and the waste outlets are not more than 30 inches apart . If your cabinet layout is unusual, that's worth a call before buying fittings.
Kitchen Sink Plumbing With a Garbage Disposal
A garbage disposal diagram replaces the basket strainer and tailpiece on one bowl with the disposal unit itself. Food waste and water exit through a discharge tube on the side of the unit, which connects into the P-trap just like a standard tailpiece would.
If a dishwasher also drains into that disposal, there's a knockout plug inside the dishwasher inlet that has to be removed before hookup. Skipping this step is one of the most common DIY mistakes we see on service calls, since water simply can't drain and it backs up into the dishwasher tub instead. Anyone tackling this upgrade solo should review drain repair services before starting, since a miswired disposal connection often turns into a bigger drain job.
Kitchen Sink Plumbing Diagram With a Dishwasher
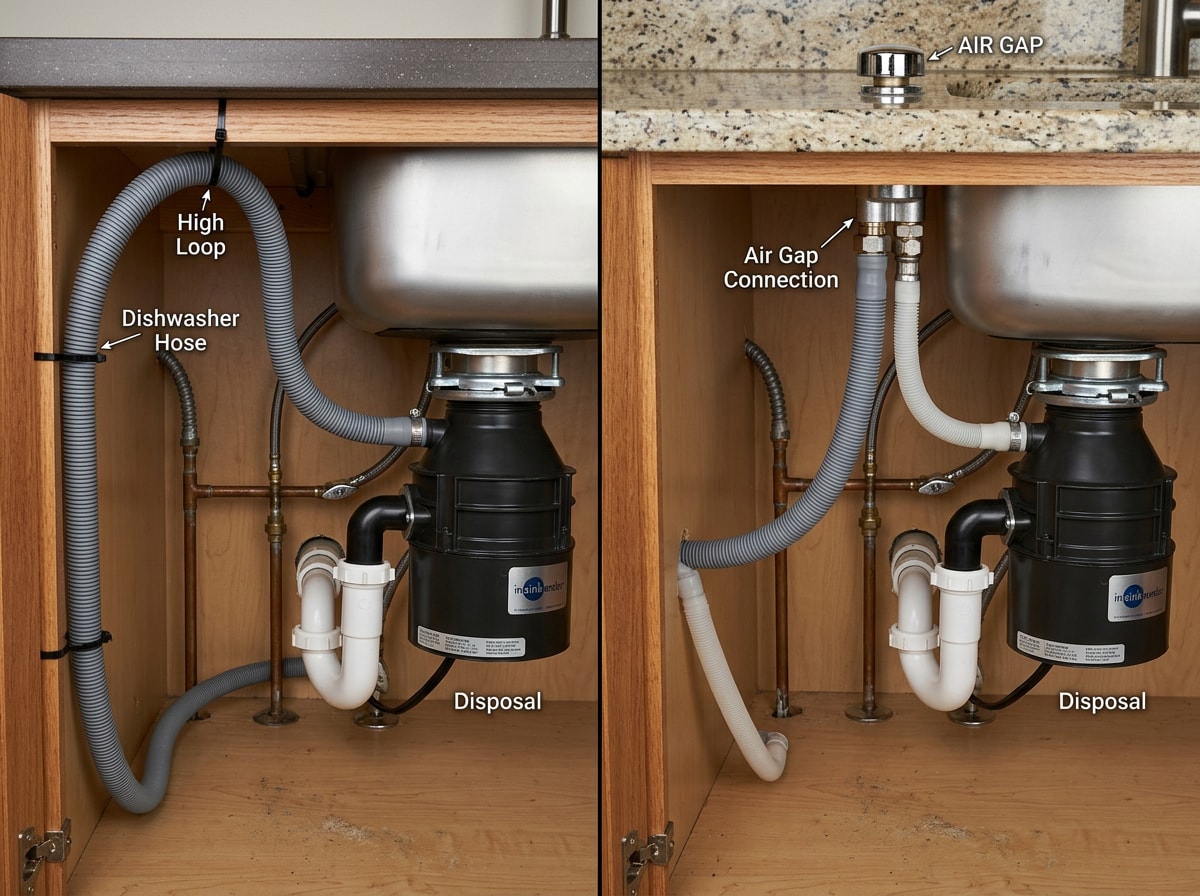
Dishwashers need a way to stop dirty sink water from siphoning back into the clean tub, and there are two accepted methods.
| Factor | High Loop | Air Gap |
|---|---|---|
| Code acceptance | Accepted in many areas | Required by some local codes |
| Visible hardware | None, hose hidden in cabinet | Small cylinder on countertop |
| Backflow protection | Relies on elevation | Physical break in the hose path |
| Typical cost | Free (just routing the hose) | $15–$40 for the fitting plus install time |
The high loop routes the dishwasher drain hose as high as possible under the counter before connecting to the disposal, using elevation to discourage backflow. The air gap is a small mechanical fitting through the countertop that creates an actual physical break between the two hoses. Air gaps are non-mechanical backflow preventers that are very effective devices to be used where either backsiphonage or backpressure conditions may exist , which is why many inspectors treat them as the stronger of the two options. Local code usually decides which one you're required to use.
Island Sinks and Venting: How to Use an AAV
Island sinks sit away from any wall, so there's no straight path to run a vertical vent stack through the roof. An air admittance valve (AAV) solves this: it's a one-way mechanical valve that opens to let air into the drain system when water flows, then closes to protect the trap's water seal the rest of the time.
Installation has a hard rule most DIYers miss: AAVs shall be located not less than four inches above the fixture drain being vented , and they need clearance to be serviced after install. Devices that pass inspection generally carry listing under national consensus performance standards published by the American Society of Sanitary Engineers, Nos. 1050-2009 and 1051-2009 , so it's worth checking the box before you buy. Acceptance varies by jurisdiction, so Bonneau-area homeowners should confirm current Berkeley County requirements before relying on an AAV instead of a vented stack.
How to Plumb a Kitchen Sink: Step-by-Step
- Verify rough-in and fixture alignment. Confirm the drain stub-out and supply lines line up with your new sink and cabinet before cutting anything.
- Install the strainer and tailpiece. Seat the basket strainer with plumber's putty, then thread the tailpiece beneath it.
- Assemble the drain and P-trap. Connect the trap arm with a ¼ inch per foot slope, matching the vent orientation to your rough-in.
- Connect supply lines and test. Attach supply tubes to the shut-off valves and faucet, run water, and check every joint for drips.
That last step matters more than it sounds. A slow drip at a slip joint can run for weeks before it's visible, which is exactly the kind of hidden leak plumbing leak detection is built to catch before it rots cabinet flooring. For anything beyond a direct swap, get a free estimate before cutting into finished walls.
Three Code Violations That Fail Inspection
Flexible or corrugated drain pipe. Banned in most codes because the ridges trap grease and food particles, clogging far faster than smooth rigid PVC or ABS. In our experience inspecting older Bonneau-area remodels, this is still the single most common defect under a kitchen sink.
Incorrect trap-arm slope. Too flat and waste sits stagnant; too steep and water outruns solids, leaving debris behind.
Missing or misrouted venting. This breaks the air pressure balance the whole drain system depends on, which shows up later as gurgling or slow drains.
Grease buildup deserves its own warning. The EPA reports that grease from restaurants, homes, and industrial sources is the most common cause of reported sewer blockages , which is exactly why smooth-walled rigid pipe is now standard instead of the corrugated kind. If grease has already built up in your line, clogged drain removal clears it before it backs up into the sink.
What Drives Kitchen Sink Plumbing Cost in Bonneau, SC?
Several factors move the price up or down: sink type, whether a disposal is being added, venting complexity, labor time, permit fees, and materials chosen.
A simple single-basin swap with existing rough-in connections is the cheapest scenario. Add a disposal, a double bowl with continuous waste, or any venting change, and both materials and labor climb. Homeowners in and around Bonneau, SC can check current coverage and get a realistic number before budgeting a project.
Farmhouse sinks often need cabinet reinforcement and custom tailpiece adapters to clear the deeper basin. Island sink plumbing runs higher too, since it usually needs either a vertical vent chase cut into the floor or an AAV installation, both more involved than a standard wall-connected sink.
For a broader primer on how kitchen and whole-home systems connect, our guide to what plumbing actually is covers the basics beyond just the sink.
FAQ
Why Is My Kitchen Sink Gurgling?
Gurgling usually means air is being pulled through the P-trap's water seal because the vent isn't working, often from a clogged roof vent or a failed AAV. If it's constant or paired with slow drainage, the venting side needs inspection, not just the drain. Sudden, worsening gurgling is a good reason to call emergency plumbing repair rather than wait.
Does a Kitchen Sink Need a Vent?
Yes. Every kitchen sink drain needs venting to equalize air pressure and protect the P-trap's water seal from being siphoned out. Without it, wastewater can't flow smoothly and the seal that blocks sewer gas can fail. This applies whether the vent is a roof stack or an approved AAV.
What Is the Standard Kitchen Sink Drain Pipe Size?
1½ inches is standard for residential kitchen sink drains, matching the minimum diameter referenced in the rough-in table above. It applies to single and double bowl setups alike; larger diameters are reserved for combined or commercial fixture runs.
What Height Should a Kitchen Sink Drain Be Roughed In?
There's no single code number. Trade practice lands most drain stub-outs between 14 and 20 inches above the finished floor, with the exact height set by your sink depth, cabinet style, and whether a disposal is going in below it.
Can I Plumb a Kitchen Sink Myself?
A straight sink swap on existing rough-in is a reasonable DIY project for a confident homeowner. Anything involving moved drain lines, a new disposal circuit, or island venting should go through a licensed plumber, since a failed inspection means reopening a finished wall. The team at KO Plumbing handles both ends of that spectrum across Berkeley County.